Disclaimer: I assume no liability for any loss or damage, direct or indirect, financial or otherwise, as a result of using these instructions. Use these instructions at your own risk and recognize that they are not factory authorized and may contain errors. Your lens may differ from the one described. Results will depend on your tools, skill level and judgement. Do not proceed if you do not have the experience to do this kind of work, and the ability to handle solvents and hazardous materials safely. Wear eye protection and comply with all local, state and federal regulations that may apply.
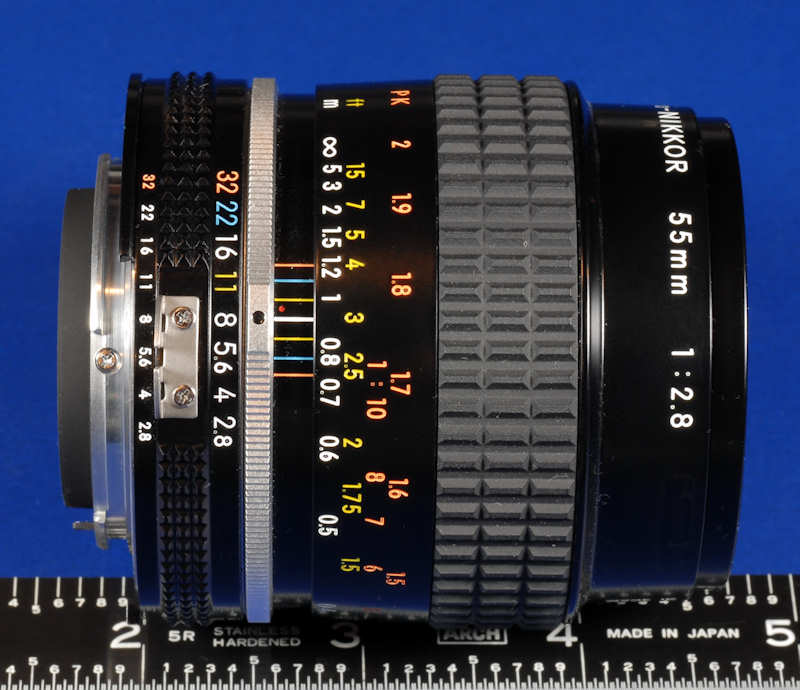
The 55 mm f/2.8 Micro Nikkor has been made in several versions. This write up is for the AiS version that began production in 1979. Other versions may or may not be similar. These otherwise excellent lenses are well known for becoming stiff and hard to focus, along with developing oily diaphragms.
The lens achieves its excellent performance through the use of a floating element, something the earlier f/3.5 version didn't have. This element is moved with a second helical mechanism. When you focus a Micro Nikkor you're essentially focusing two lenses at the same time, and any drag caused by old thickened grease will be twice as noticeable. The finer half of the helical thread pair for the floating element is a close fit and has a lot of engagement area. Problems with old grease tend to show up there first.
Given the right tools and materials, the lens is actually quite easy to service. The only significant issue is correctly reassembling the second helical thread pair such that the element spacing is correct. I'll give you some measurements to insure this, but check your lens during disassembly to be sure it's similar to the ones I've serviced. If your lens has been incorrectly assembled at some point, there's a good chance that following these instructions will return it to satisfactory operation.
You will need a Phillips style screw driver that accurately fits the screws. Some will have been secured with thread locking compound and will be quite tight. The screwdriver must fit well so it can't slip and damage the screw heads or the lens itself. I've had good luck with the commonly available German Wiha screwdrivers, 261 series, PH00x40 and PH0x50, though there are special Japanese (JIS) screwdrivers available from the specialty tool distributors that should be an even better fit to the Japanese screws. Some screws will be very tight, so correct screwdriver fit is critical.
You'll need a suitable lubricant. This can be a large and confusing topic, far beyond the scope of this write-up. The ideal lube will not harden or thicken with age. It won't be too thick or too thin. It will stay where you put it. It won't creep and contaminate the aperture blades. It will maintain a constant viscosity over a wide temperature range. The oil won't out-gas out and leave a film on the lens elements. Of course it would be nice if this unobtainable substance were easily available and inexpensive.
Almost anything that comes from an auto, bicycle or home store will not be suitable. The finer helical thread is a close fit and most greases are too thick and viscous for it. Common greases are NLGI #2 and far too thick. You really need a #1, actually even lighter than that. I've been using Dow Corning Molycote PG-30L, a very light grease with a synthetic oil base that's safe for most plastics.
The PG-30L worked well on a half dozen lenses, but after servicing a couple that proved very troublesome in the torque and smoothness department, I had to reexamine both how drag in various parts of the lens affects operation, and my choice of lubricant.
The issue is how well the outer helical can drive the inner without binding up. This may be affected by the original fit of the parts and how much use/wear the lens has seen. Most of the lenses I've serviced worked fine with PG-30L on the inner helical, and a few drops of oil added to the outer to bring the grease viscosity back to something reasonable. For a couple the outer was so bad it had to be flushed and regreased. This was a dismal failure because using even a light grease on both the inner and outer helicals resulted in far too much focusing torque and likely excessive strain on the mechanism. One lens had trouble driving a lightly greased inner helical, regardless of what lubricant was used on the outer, suggesting that something lighter still was needed for the inner helical.
Obviously a light lubricant is needed, but one with just enough viscosity to give a smooth feel. Though it seems risky, this is a lens where the right oil may be a better choice than grease. As for choosing the right oil, that clue came from a forum I found while doing research on the matter- Personal-view. The SuperLube oil product referred to, p/n 51004 is a synthetic 40W with PTFE. It's inexpensive and available on eBay and from Amazon at low cost. It can also be ordered from Home Depot. It's a proper synthetic lubricating oil with none of the unnecessary and potentially problematic additives you might find in a synthetic motor oil. I did tests for aluminum-on-aluminum galling and for evaporation and creep; it did better than most other oils and greases, but use it sparingly because any oil will migrate to undesired areas if you use too much. 1-2 drops is all that's needed at each interface, maybe less than that if it's brushed out carefully. Remember that even Nikon had a problem with oily diaphragms on these lenses, so the utmost care is needed.
Be sure to have a clean work area and lay things out neatly. You'll want some lens cleaner and lens tissue (and/or a microfiber cloth), a large ear syringe to blow off dust and maybe some small containers for screws and parts. You'll also need some cleaning solvent that's effective on the old grease. You want to begin with the least aggressive and hazardous solvent that will get the job done. That's probably lighter fluid (naphtha) or mineral spirits.
Let's begin!
We'll start with some specific settings on the lens. This will insure that the internal parts are in specific positions. There is nothing special about these settings; they are just the arbitrary settings where it was convenient to measure certain dimensions you'll need later. Set the aperture to f/8 and the focus to 3 feet as shown above.
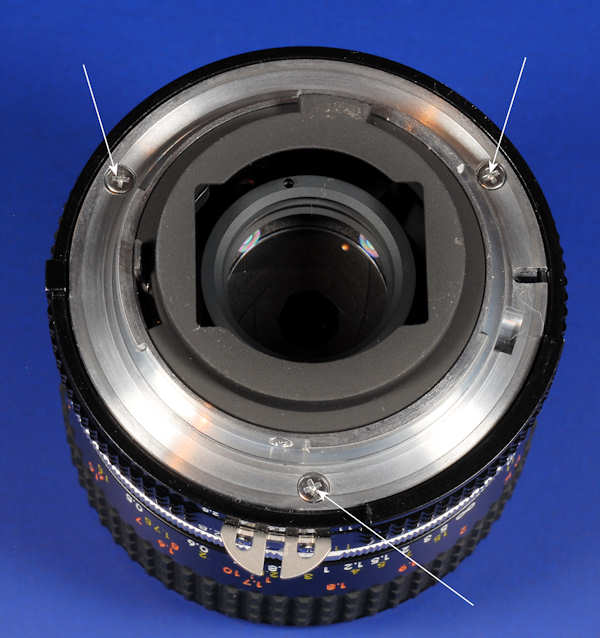
Remove the three screws holding the mount to the back of the lens and lift it straight out.
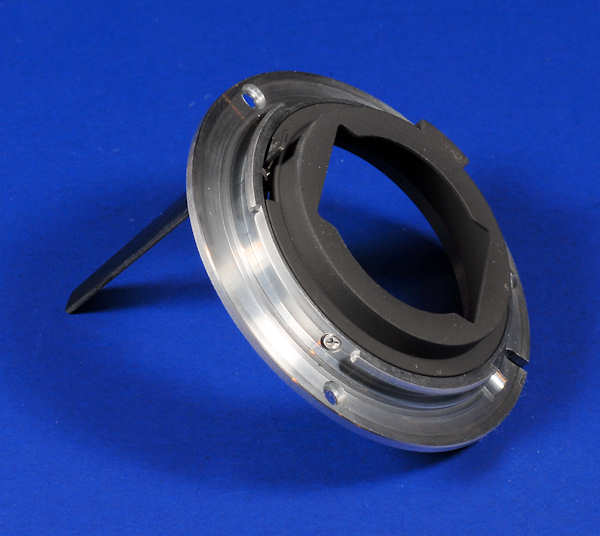
The automatic aperture arm is very long on this one, as it has to accommodate the long focus travel.

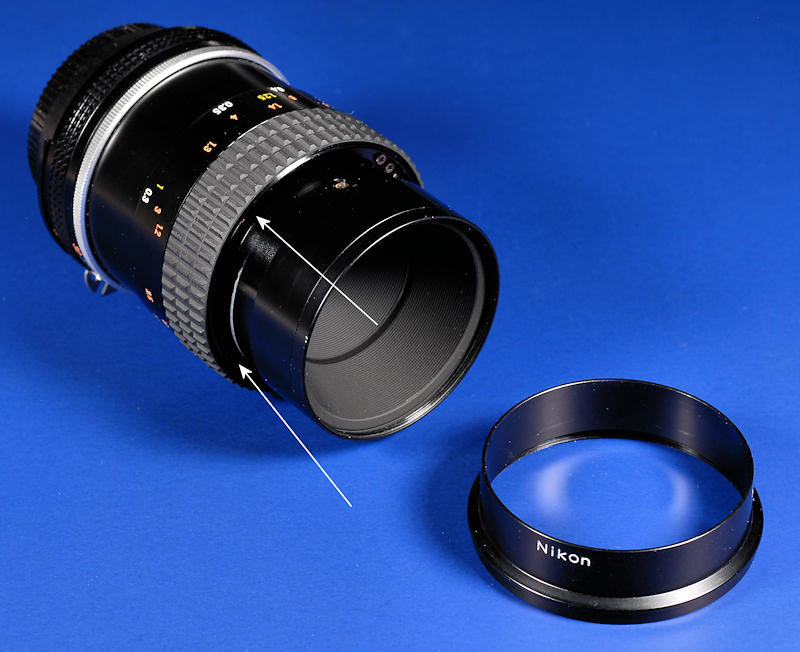
The entire lens module is held in by the three screws shown. Note that during reassembly the slotted screw head to the left of the upper mounting screw must fit in a close fitting notch for everything to seat correctly. Remove the three screws and maneuver the module out the front.
You'll have to tilt it slightly to unhook the aperture tab from the big slot shown at about 2 o'clock above.
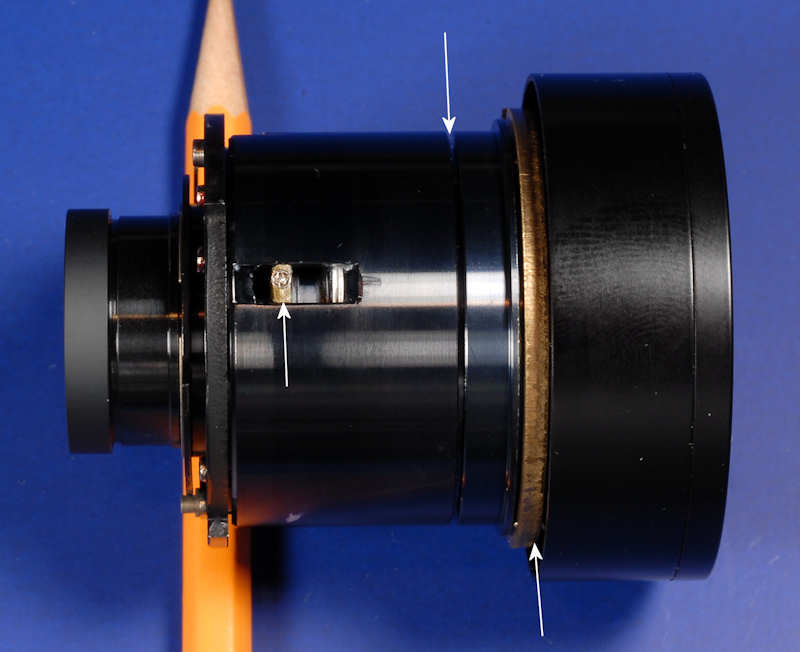
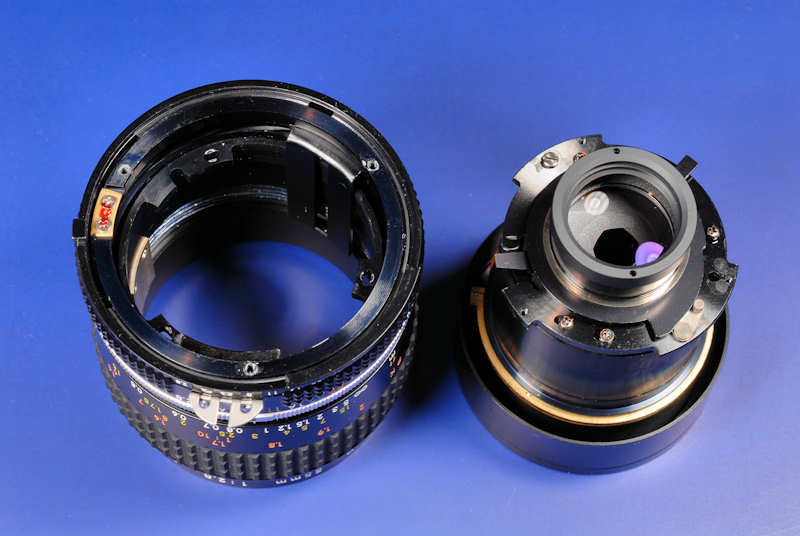
Now is the time to check your lens module to confirm that the dimensions are very close to those given here. For the 3' focus setting asked for above, the anti-rotation tab should be about 1/3 of the way across the slot. The gap shown in the middle should be about 0.025" wide. The surface of the brass ring with the tab should be just about even with the edge of the housing as shown by the arrow. This is our reference position and errors during re-assembly will be very obvious on comparison. If your lens is different, be sure to record and use the original values for reassembly! As far as I know, and as long as the brass ring hasn't been removed or come loose, there are no subtle or non-obvious errors to worry about. If, on reassembly, your lens module is close to the conditions given (or the ones you recorded), you're good to go.
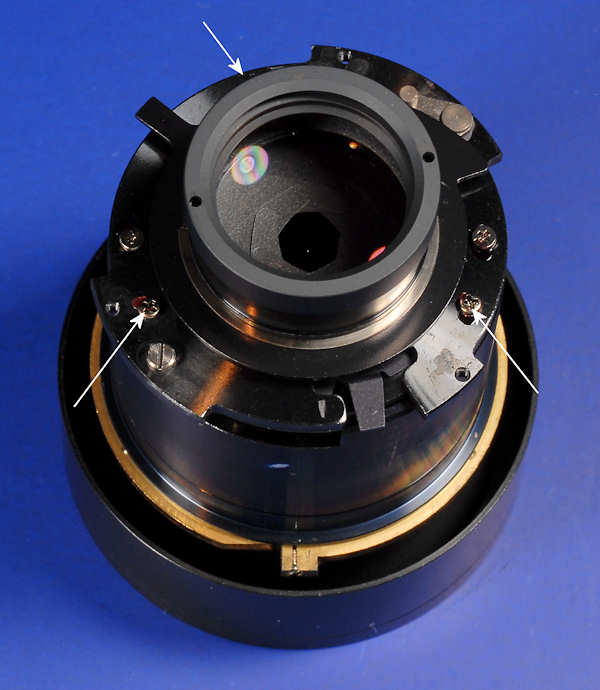
The aperture assembly is held by the three screws shown above. Remove the three screws and lift off the aperture assembly and its associated lens. The screws are not equally spaced so it only goes together one way, no alignment marks needed.
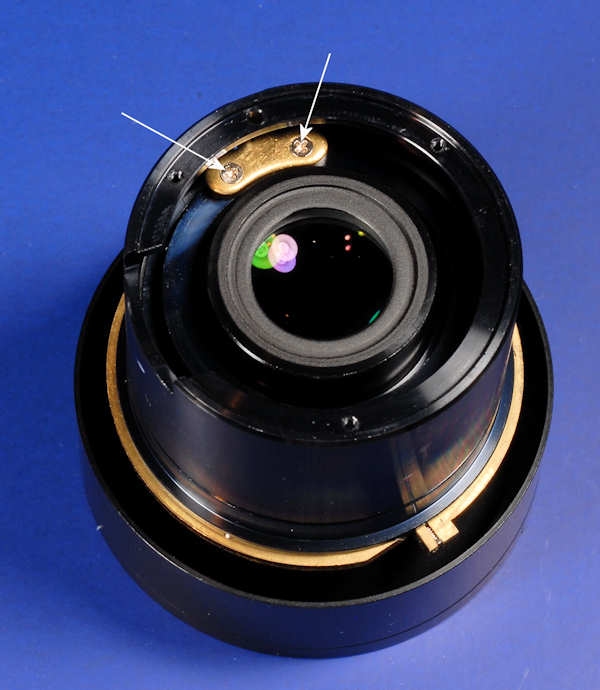
We're nearly there! Rotate the brass ring to give yourself some working room, then remove the two screws holding the anti-rotation tab shown above. Be sure the screwdriver fits well as they will be tight and thread locking compound was used. Lift out the anti-rotation tab with tweezers.
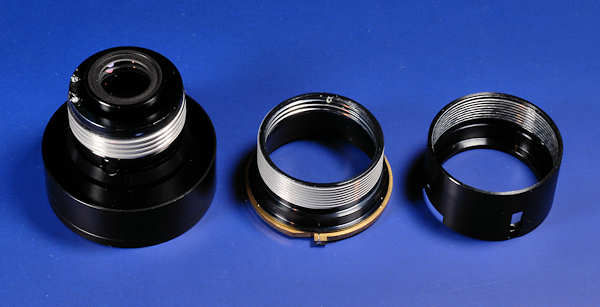
Unscrew the three components. The finer thread is left handed. Do not remove the brass ring! Disassembly is complete, so it's time to talk about cleaning and re-lubrication.
The two threaded barrels on the right can be immersed in solvent. I like to use an ultrasonic cleaner, but a toothbrush or piece of rag will work. Avoid excessive contact with the solvent and wash up afterwards. Dry the parts with compressed air if you have it. When the parts are clean and dry, distribute a drop of oil on the threads and carefully screw the two pieces back together. Wipe away any excess and be sure they move freely. This is the location where a thick or viscous grease will create way too much drag.
Obviously you can't immerse the lens element on the left so use the edge of a folded piece of paper towel to clean the threads. Be sparing. Do not get any solvent on the lens elements or let it seep into where the parts are screwed together. Don't get any on the painted front portion of the barrel. (I've had no trouble with naphtha damaging any part of the lens, including printing or the rubber grip.)
Now comes the only tricky part of this whole procedure, and it's not really very tricky. The coarser thread is a two start thread. That means it can go together two ways, and only one of those ways is correct. Apply a thin film of oil and screw in the remaining barrel. Make sure both threaded portions operate smoothly. Adjust the assembly so the brass ring is even with the housing and the gap described earlier is about 0.025" wide. Now, look at the location of the mounting holes for the anti-rotation tab. If they are close to lining up with the slot, you're good to go; reinstall the anti-rotation tab. Be sure it has the countersinks for the screws facing up.
If the mounting holes are about 180 degrees away from the slot, you need to restart the inner barrel that carries the lens element. Unscrew it and rotate it 180 degrees from where it just comes apart. It may take a few tries to get it together, as multi-start helicals are often hard to get started at all. Keep at it and don't force anything. This is no place to be heavy handed. You only need to get it started correctly once. When you have the anti-rotation tab installed, rotate the brass ring back and forth to check for reasonably easy motion and that the gap is correct when the back of the brass ring is even with the housing.
Reassembly is now just a matter of reversing the steps above. If the aperture blades are oily, the lens assembly must be removed and everything else cleaned and dried. Even if the blades are clean, inspect the frame and clean off any oil that might have migrated to the surface. That oil is trying to get to those blades! Do any necessary cleaning of lens elements at this point as well.
I haven't addressed disassembly and cleaning of the main focusing helical. It's usually far less of a problem and I've yet to take one completely apart. If it seems to be getting stiff (and even if it isn't) I'd suggest applying a drop or two of a good synthetic oil to the threads. That will mix with the grease and restore normal operation. I use Break-Free, a high grade oil with some Teflon additives, often found in the sporting goods section of your local discount store. Extend the focus and be sure to lube both sides of the helical. Cycle it a few times. This trick is reasonably safe, as the path to the aperture blades from the main focusing helical is reasonably long. Still, inspect the main focusing helical before reinstalling the lens module and be sure there is no excess lubricant, especially oil, that can run down near the back end of the lens and find its way to the aperture mechanism. I have not tried the SuperLube oil to thin the existing grease on the outer helical, but have used it successfully on its own with clean parts. If the outer helical is too stiff regardless of what you do, see the followup notes at the end for cleaning and lubrication instructions.
If the focus is set to 3' and the lens module is as described above, everything will be very close to sliding together. The aperture control tab must be tilted into its slot first. The tab on the brass ring must engage with a slot, so it might be necessary to rotate the focus ring slightly. The assembly will normally drop in quite easily with a bit tilting and wiggling. If you have trouble, it may help to extend the focus a bit and readjust the brass ring to align with its slot. That gives a bit more wiggle room. I don't re-lacquer the screws, as it's more of a tamper indicator than protection against loosening. Reinstall the mount, check that the auto-aperture works freely and the lens should be good for another couple decades.
For reference, the front section of the focus barrel unscrews just underneath the front of the rubber grip. This gives access to the slots and locking screws to adjust the infinity focus point (I think). It also gives access to the anti-rotation stop that has to be removed if you need to disassemble the outer helicord. The front of the barrel may be quite tight and it is strongly recommended not to make the infinity adjustment unless absolutely necessary. The factory will have set it correctly, and unless the lens is extremely worn or previously disassembled, it should be correct when the lens is reassembled. I've been unable to loosen the front section on several lenses, probably because they got some screw lacquer on it, so it's fortunate that you don't usually have to.
Conrad R. Hoffman
4/16/2010 (major edits 2/16/2016)
Additional- The lens illustrated above is s/n 537xxx and I've also serviced an identical s/n 572xxx. I recently serviced an earlier s/n 195xxx Micro Nikkor. The earlier lens used a slightly different auto-aperture mechanism on the lens mount, but was otherwise identical. All dimensions and procedures matched the above write-up. The older auto-aperture mechanism doesn't include a return spring and is prone to rattle, which is of little consequence. The grease in the focusing helicals was OK, but the lens had the well known oily diaphragm problem. It appears the source of oil may not be either helical, as I originally speculated, but migration of factory applied oil from various aperture parts. The easiest way to clean the aperture mechanism is to remove the lens elements from one side, making careful note of the curvatures and the direction they face, then soaking the rest of the mechanism in naphtha or a similar solvent. Gently cycle the aperture when completely wet with solvent, then allow it to dry. Never try to move an aperture that isn't completely wet (submerged) or that shows any resistance, lest the blades be damaged. It's hard to get shutters and apertures dry- be patient. Only use an air blast from a foot or so away, as the blades are fragile. Apply a the tiniest film of grease to the actuation cam and reassemble.
Aperture and shutter blades are never lubricated, but the surrounding actuating mechanism, especially on shutters, usually is. I don't know if the Micro Nikkor aperture mechanism should be oiled or not. Speculating, if the lens were used at high frame rates for a long period of time, lubrication might be critical. You'd want to fully disassemble the mechanism and evaluate what points needed lubrication. For normal applications it's probably not an issue. The downside of oil is that it migrates and may eventually contaminate the aperture blades. It's also a temporary measure and a lens seeing high frame rate use should probably be serviced every couple years. Cameras and lenses used in that manner will wear out and fail; fortunately almost no amateur equipment sees that level of use.
1/18/2016- I've now serviced two of these lenses (s/n 384xxx & unknown) where the inner helical grease wasn't bad, but the outer helical was the source of most of the stiffness. Though it could be improved with a couple drops of Break-Free, the end result still wasn't as easy to focus as desired. I also had the opportunity to handle another Micro-Nikkor (508xxx) and was surprised at how easily it turned. It felt brand new. They seem to use a much lower viscosity grease than is used in other lenses, and it doesn't have much, if any, damping characteristics. It has a more fibrous sound and feel. Maybe it had already been serviced, but I doubt it. More likely the grease thickening has something to do with storage conditions. I haven't had the courage to disassemble an outer helical, as it appears to be an awkward affair, and getting the multi-start threads back together correctly might be very difficult.
Some lenses have used very strong threadlocker on the three mount screws. To get them loose you need a perfect fitting screwdriver and heavy pressure so it won't slip or deform the screw, but that may not be enough. For the stubborn ones I've had success by holding a very hot soldering iron against the head of the screw for about 1 minute to heat it and break the locking compound. I set my soldering station to about 900 degrees and put drop of solder on the tip to help heat transfer. Since the screw and ring are stainless steel there's no danger of the solder sticking, but watch out for nearby plastic parts, not to mention the lens surface.
2/6/2016- Disassembling the outer helical isn't as bad as I thought, but it's not for the faint of heart. To get it completely apart you have to be able to remove the plastic front section of the focusing barrel, and this can be difficult to impossible. There's a good chance they got lacquer on the front section when they lacquered the adjacent screws, making removal risky. Even if you can't remove it, the helical can be disassembled enough to clean it. All this is done with the lens module removed from the barrel. Before doing anything, set the lens to infinity and use verniers to measure the distance from the face of the lens module mounting ring, to the rear surface that the lens mount attaches to. Record that number, which should be about 0.236". Note the exact rotation of that piece as well, since you'll have to get it back together in the same orientation. Remove the small brass stop for the aperture ring at the rear (two screws). Extend the lens about half way. Work off the aperture ring, which has to immediately fold 90 degrees so the tab can exit the slot. Don't force anything excessively, though it may be a bit stubborn. The detent is just a spring steel tab- no tiny spring and ball to get lost. Now exposed will be three screws on the side holding the large anti-rotation tab. They will be tight and have thread locker, so you need a perfect fitting screwdriver to remove them. Use heavy pressure so the screwdriver doesn't slip or strip the heads. With the anti-rotation tab removed you can unscrew the focusing ring, but make note of exactly where it pulls free. That's the location where you need to start it, or at least a clue. It was 0.8 m on the last one I did, but it could probably be anything. There are multiple starts and only one will have the infinity mark line up with the index at the right clearance, about 0.075", or so the space is near equal on both sides of the infrared focusing dot.
To remove the inner threaded piece you have to remove the brass stop held by screws under the front plastic ring. I haven't gone this far, so can't say more. If you remove it, on reassembly you'll have to find the correct start so the distance and rotation recorded above are correct. Even if you don't remove it, it's possible to clean the assemblies with naphtha, which doesn't seem to bother any of the printing or rubber if you don't leave it on too long. I fully immersed the parts and ultrasonically cleaned them, but you need compressed air to get the solvent off completely and promptly. You can rotate the threaded section under solvent to get the grease/oil cleaned out, and then blow it dry with compressed air.
CAUTION: Be very careful not to rotate dry unlubricated parts with any pressure at all, as they could instantly seize up, never to move again! No guarantees, but slightly seized parts can sometimes be freed if some IPA is injected into the threads. Seizure will damage surfaces and smooth operation after that is unlikely.
Again, apply 1-2 drops of SuperLube to the threads and spread it out a bit. The danger of oil from the outer helical getting where it shouldn't is less than the inner, since the distances to the lens itself are much longer.
Assembly is just the reverse of disassembly. Getting multi-start helicals back together requires the gentlest touch and much patience. If you even slightly force it, the parts may be damaged and never go back together or may not operate smoothly. When you happen on the correct alignment, they'll almost fall together on their own. The outer needs to align at infinity. The inner needs to have the correct spacing that you measured earlier when it's rotated to the correct stop position. Put a little grease on the sides of the anti-rotation tabs and on the aperture ring detent. I think the factory used a black moly paste at that point and where the lens module tab engages the slot in the barrel, but a film of any light grease should be suitable.