There are lots of designs for ball turning attachments out there so it's hard to believe that another one is needed. Alas, none met all my requirements so I offer yet another variation here.
Before describing the design, let me review my list of requirements.
Because I expect to use the tool more for putting a radius on the end of adjustment screws and feet, rather than for making decorative balls on machine handles, I want it to install quickly like any other cutting tool. There is a beautiful design available on-line for a tool specifically designed for the Logan, but it requires removing the compound. Though a fairly simple matter of two nuts, and technically the QCTP isn't disturbed, I wished to retain the "quick" part of the QCTP in this design.
My Logan 10" lathe has limited travel of the cross slide, about 4.5 inches from the spindle axis to the center of the QCTP. This assumes the compound is backed out a bit as well. The cross slide will go a bit further, but the feed dial becomes obscured and the ways lose a lot of contact. The ball turner needs to be compact enough to fit in this space. More so, as the radius of the largest ball has to be accommodated. I've seen a design that used a boring head to hold and adjust the cutting tool, but holding my 2" boring head up to the lathe showed this to be an impossibly tight squeeze. It did, however, trigger the thought of using a much more compact slide instead of a boring head.
There are a variety of yoke or gimbal type designs that have been made over the years. Most of these require presetting the tool for the desired radius, something I consider a non-starter in precision work. The design must have a screw to adjust the cutting tool position, with a resolution better than 0.0005".
The distance from the top of the compound to the spindle axis is 0.9175" on this machine, so that has to be taken into account in any proposed design. Even if one were willing to remove the QCTP, there just isn't enough room for something that sits entirely on the compound; whatever the device is, it has to extend beyond the compound.
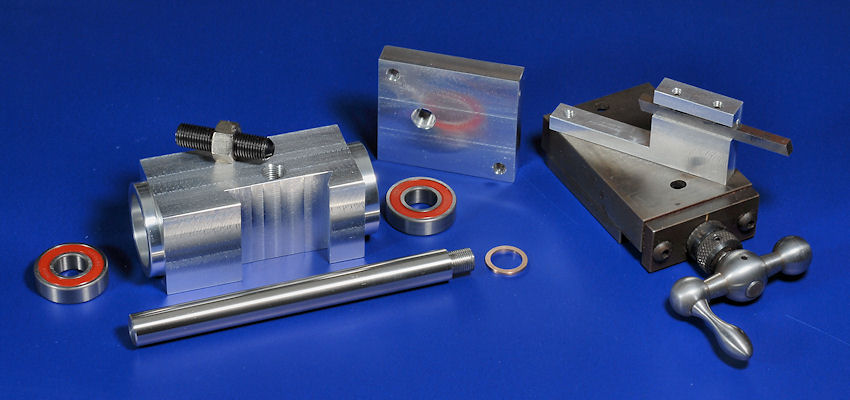
This was supposed to be a junkbox project but my junkbox sometimes contains a few jewels. In this case it was a small Gilman machine tool slide. If you don't have something similar, an equivalent can certainly be machined. If I were building this again, and if I didn't have a stage, I'd probably use a larger shaft and machine a dovetail slide directly in the end of it. That would make the unit yet more compact and improve rigidity. Here are most of the parts.

The shaft is 0.500" 303 stainless with a 0.375" x 32 thread on the end. That screws into the plate that mounts the stage. My thread choice is based on the taps I own. Later on I threaded the other end of the shaft at 0.500" x 32 for a jam nut to tension the bearings and for the control wheel. Why 32 tpi? The lathe was already set up for it and it seemed a reasonable thing to use. The sealed bearings were also from the junk box, 1.125" OD and 0.500" ID. The piece of ground shaft was polished down a bit for a moderate hand press fit.
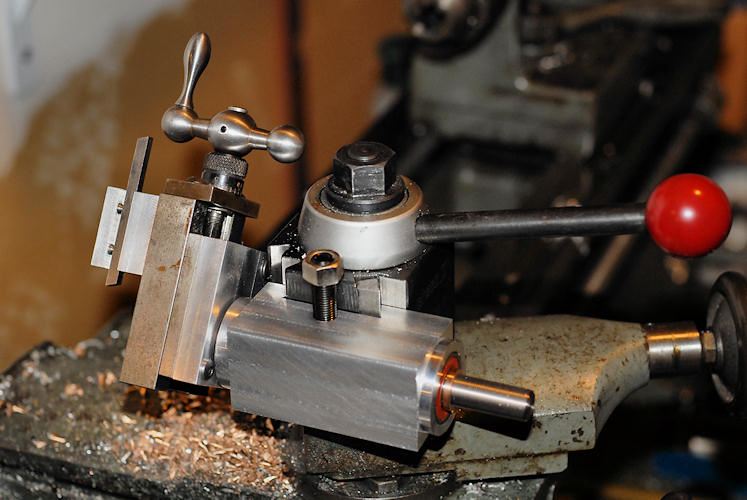
Here's the initial assembly of the unit.

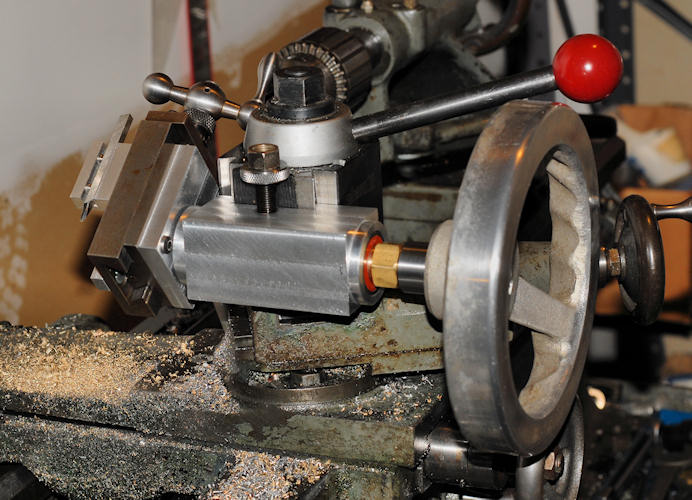
My intent was to install the usual control arm but after a bit of thought I decided on a nice hand wheel, again from the junk box. Though a handle will work fine, having two hands on a wheel gives surperb control of the cutting action. It's the difference between steering your car with a pair of Vise-Grips locked to the steering column, vs a proper steering wheel. In this next photo the lock-nut for the height has been added, a jam nut to tension the bearings and an adapter for the hand wheel. It can't be seen, but the brass nut to tension the bearings is locked with a Nylon-tipped setscrew.

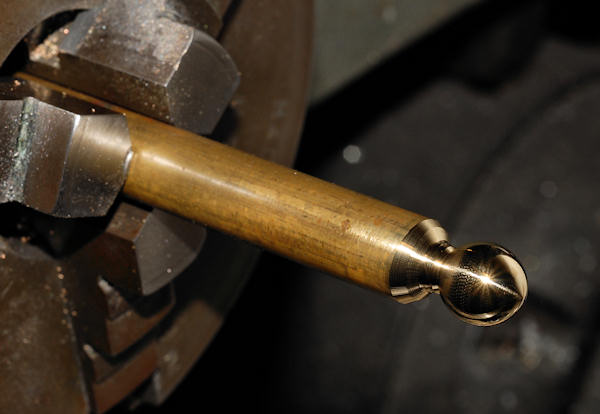
The unit is easy to set up. First, adjust the cross slide until the cutting tool lines up with the center of a face cut on a rod. Next, make a trial cut and measure the ball straight up and at 45 degrees. Adjust the height of the assembly on the QCTP until these numbers are equal. You shouldn't have to readjust this once it's set. Here's the first ball I turned. It's a bit out of round, as I just eyeballed the height.

You'll notice the two round ends on the body. The body was initially center drilled in both ends and the round areas turned with the body on centers. This was just a convenience so I'd have someplace to run an indicator when the body was set up in the 4-jaw chuck. That method wouldn't be good enough to align the bearings for a high speed spindle, but was plenty accurate for this device.
The tool holder will definitely be replaced soon. I didn't allow quite enough metal on the back side, so it bends slightly when the set screws are tightened on the tool bit. The tool bit should be on the axis of the slide, so material will simply be added to the far side of the piece, making it asymmetric. Steel would be a better choice. It was also suggested that the slot for the tool bit could be angled a bit to provide some positive rake. I think this is an excellent idea as it will improve the performance of flat ground tools. The slot width is chosen for 1/4" and smaller tools, but design for whatever you tend to use.
One could use cone bearings like a jewelers lathe and a much heavier shaft with the stage dovetail milled right in the end. The cone bearings could be lubricated with some Nye damping grease to better control the feed rate. You should certainly add some adjustable stops. Just random thoughts. Don't get the idea that this is some highly optimized design. It isn't. I wanted a ball turner and I wanted it fast!
This is an easy project to build, though you do need to hold close tolerances on the bearing bores. I designed and built it over a three day weekend, and only a few hours a day were available to work on it. In fact, I don't even own a proper mill, just a Grizzly mill/drill. It's expected that you won't just duplicate my design, but adjust things to match what's in your junk box and to better fit the lathe you intend to use it with. My Gilman slide had about 3/4" of travel beyond center, so I designed for a maximum 1.5" ball diameter. You may want more or less. Be careful with the dovetail. I just duplicated the dovetail on a tool holder, but in spite of my best efforts, I cut it a tad too wide. You don't want the QCTP handle to swing around too far lest it interfere with the operation of the ball turner, so keep the dovetail on the tight side. I tend to design and make parts without any drawings, much to the dismay of my friends and coworkers, but here's a rough pdf file to pin down a few dimensions and show where I started.
Outline & random dimensions (pdf)
C. Hoffman
September 19, 2010